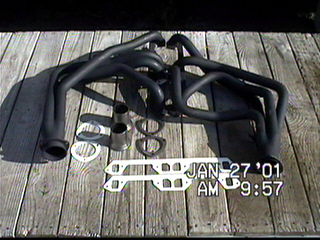
To make your header install go as smoothly as possible you will want to make a list of everything you will need. I don't like making trips to the parts store while in the middle of a project. I have a second vehicle which allows me to do it if necessary but if you don't have that luxury planning is extremely important. See the list of things I used above. My headers arrived with several scratches so the first thing I did was apply several coats of high temperature paint to cover the scratches and prevent rust.
I ended up removing my starter and oil filter to remove the old headers and install the new ones. You may wonder why I replaced perfectly good headers: there were several reasons. The old headers had been installed with a header gasket on one side and a exhaust manifold gasket on the other side. Both were leaking exhaust badly. This leak was very loud and filled the engine compartment with exhaust fumes. The guy that installed the old headers had used the smash-to-fit process to get the drivers side in, and there was a one inch cut in the one of the pipes. Besides they just looked old and rusted and I wanted some new looking ones. Since I had to fix the leaks anyway, I figured I would install new ones. 
I chose to use allen head bolts (grade 8) because I had a long and diffacult time removing the old header bolts. There was not enough space to get a socket over the heads so I rotated the bolts a few degrees at a time with an open end wrench. This plan was foiled, however, because I could not get my allen wrench into position either. The header pipes were in the way. The ideal tool would have been an allen wrench with the small ball at the ends that acts like a U-joint. The night before I started my project, I soaked every nut and bolt on the headers to loosen them up. I also drained the oil and removed the oil filter. This gave me more space to work and I needed an oil change anway. The first thing I did was disconnect my battery. I would be removing the starter and did not want sparks to fly when I disconnected the wiring. Next I marked the plug wires, removed them from the spark plugs, then removed the nuts and bolts that secured the old headers. After the headers were loose I positioned the drivers side header where I could remove the starter bolts. The starter is heavy and I almost smashed my face when I removed the second bolt. Gravity will assist in the removal of the starter but will also allow it to touch down with much force. Here you can see the clearence I had on the drivers side. I needed just a little more space. 
Next, I removed the two engine mount nuts on the underside of the engine support cross member. This allowed engine movement and more room to remove and install the headers. You might not need this room on the passanger side but there is no way to get them in on the drivers side. (SEE PHOTOS OF OLD HEADERS: SMASH-TO-FIT MARKS)
Place a floor jack under the bell housing area of the transmission (place a small block of wood on the jack to avoid damaging your transmission and evening out the pressure), and slowly lift the engine about an inch or so, check to see if old exhaust will clear. If not, raise engine until they do clear. Remove old headers or exhaust manifold. 
I noticed the old header was dented and worn on the number seven pipe so I installed the header, and lowered the engine. When in position, it was touching the frame. I used a 2X4 and a hammer to gently reshape the pipe so I would have at least a quarter inch clearance. This picture shows the pipe going to the number seven exhaust port slightly oval rather than round. I say a quarter inch because when you measure and bend your pipe it will most likely be WITHOUT the gasket. The gasket will push your header out toward the frame about 1/16th of an inch.

Next, I scraped the exhaust ports of crud and wiped the surface with laquer thinner. I then ran a small bead of high temperature sealer around the ports on the header. ( The raised part around the holes in this picture.) The surface where the pipes met the mounting bar was not smooth and I wanted to prevent any leaks. I mounted the gaskets to the headers then from the bottom up, moved the headers into position. While the drivers side was in position, I adjusted it where I could install the starter and reconnect the wires.
Next I moved the header into position and finger tightened the two end nuts. I installed the four remaining bolts and tightened them down from the center out. I only got to use two of my new allen-head bolts on the drivers side because there was no way I could have tightend them without special allen wrenches with u-joint type ends. The passanger side went in without a hitch except for the number eight pipe was curved so tight that I could not get a bolt started into that hole. On this side I was only able to use one allen-head bolt and had to use the old bolts and spend about fifteen minutes tightening them with an open end wrench.
I installed my new oil filter and reattached all my plug wires, checking to make sure they were in the correct firing order. I lowered the engine and once again checked the clearance on my number seven pipe. It was a little less than a quarter inch, passable. I tightened the engine mount bolts, added five quarts of oil and started it up to check for leaks. I had no leaks and the engine compartment was much quieter. My headers looked new, had no rust or severe damage. NOTE: 1. My engine mounts were in desperate need of replacement, they were cracked and sunken. New ones might have provided me enough clearance for the drivers side header without having to bend the pipe. If yours look like they are in need of replacement get some new ones. It may save a few steps.
2. After 300 to 500 miles, retighten the nuts and bolts on the headers to insure a good seal.
|